Combining the magic of festive cookies with a creamy treat, this homemade ice cream with Christmas cookies is the ultimate holiday dessert.
Celebrate the holiday season with this festive and easy-to-make no-churn Christmas Cookie Ice Cream!


Note: This post may contain affiliate links for your convenience. You can read our full disclosure policy here.
Christmas cookies are probably one of the things I most look forward to every holiday season.
There are so many varieties, and they always bring a smile to the faces of loved ones.
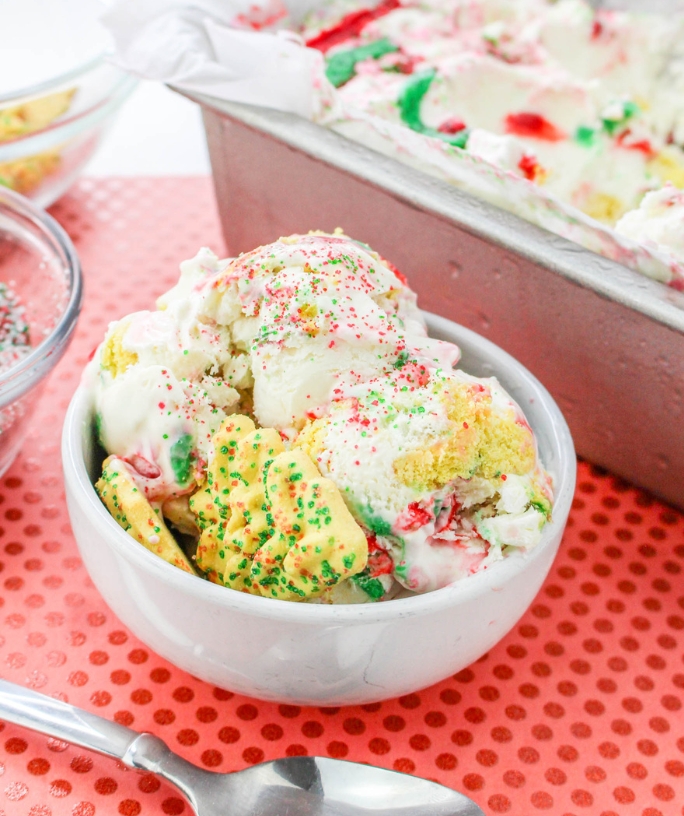
But imagine taking your favorite Christmas cookies and mixing them into creamy ice cream, swirled with festive red and green frosting and topped with sparkling sugar sprinkles.
Perfection!
Every bite is a taste of holiday bliss, making this dessert as pretty as it is delicious.
If you want a simple way to turn Christmas cookies into something fresh and unexpected, this no-churn Christmas cookie ice cream is the answer.
The best part? No ice cream machine is needed, so it’s super easy to make!
More No-Churn Ice Cream Recipes:
- Christmas Tree Cake Ice Cream
- Cotton Candy Ice Cream
- Turtle Ice Cream
- Chocolate Marshmallow Ice Cream
- Mississippi Mud Ice Cream
- Red Velvet Ice Cream
- Black Forest Ice Cream


No Churn Ice Cream with Christmas Cookies
To create the perfect holiday ice cream, we start with a creamy vanilla base that’s easy to make and endlessly customizable.
Heavy cream gives it that luxuriously smooth texture, while sweetened condensed milk adds the perfect amount of sweetness that enhances the cookies.
For a fun, festive twist, swirls of red and green frosting are piped in between the layers of ice cream, creating colorful ribbons in every scoop.
Coarsely chopped sugar cookies add a satisfying crunch, and the red and green sprinkles give a final, sparkly touch.
If you’re looking for a treat that’s both impressive and easy to make, this Christmas Cookie Ice Cream is a must-try!
Grab your extra cookies and serve up this Christmas cookies and cream ice cream at your next holiday party.
How to Make Homemade Ice Cream with Christmas Cookies
It’s really easy to make this holiday treat.
Ingredients You’ll Need:
- Christmas Sugar Cookies
- Heavy Cream
- Sweetened Condensed Milk
- Vanilla Extract
- Red Frosting
- Green Frosting
- Red and/or Green Sanding Sugar
- Sprinkles for Topping


How to Make It:
(Full printable recipe card is available below)
Prepare the ice cream base. First, you’ll beat the heavy cream until stiff peaks form.
Gradually pour in the sweetened condensed milk and vanilla extract while continuing to beat on low speed until no streaks remain.


Fold in the cookies. Next, you’ll use a rubber spatula to gently fold the chopped cookies into the ice cream mixture.


Layer the ice cream mixture. Then, spoon half of the ice cream mixture into a quart-sized freezer-safe container. Pipe swirls of red and green icing over the ice cream.
Add half of the remaining ice cream mixture, then add more icing swirls. Top with the remaining ice cream mixture.
Sprinkle the top generously with the colored sugar sprinkles.


Freeze and serve. Last, you’ll cover the container with plastic wrap or a lid and freeze for at least 6 hours or until the ice cream is firm.


When ready to serve, scoop the ice cream into bowls or cones.
Feel free to garnish with additional Christmas cookies, if desired!


Notes and Adaptations:
- You can use store-bought or homemade Christmas cookies in this ice cream. The cookies will soften a bit in the ice cream, so crunchy cookies tend to work best.
- You can generally find red and green frosting in the baking aisle of the grocery store during the holiday season.


Recommended Equipment:
- Red and green sanding sugar
- Stand Mixer or Electric Hand Mixer
- Ice cream container – I like this insulated container for transporting ice cream, or these containers for easy storage. You can also use a 9×5″ loaf pan.
- Ice cream scoop – My two favorites are this scoop and this more traditional variety.
No-Churn Christmas Cookie Ice Cream

Christmas cookies and ice cream are a match made in heaven, and this dessert is the proof! It's an easy no-churn ice cream that's perfect for the holidays.
Ingredients
- 2 cups Christmas sugar cookies, coarsely chopped
- 2 cups heavy cream
- 14-oz can sweetened condensed milk
- 1 teaspoon vanilla extract
- 1/4 cup red frosting, in a piping bag
- 1/4 cup green frosting, in a piping bag
- Red and/or green sanding sugar sprinkles for topping
Instructions
- In the bowl of a stand mixer fitted with the whisk attachment (or in a large mixing bowl with an electric hand mixer), beat the heavy cream until stiff peaks form.
- Gradually pour in the sweetened condensed milk and vanilla extract while continuing to beat on low speed until no streaks remain
- Use a rubber spatula to gently fold the chopped cookies into the ice cream mixture.
- Spoon half of the ice cream mixture into a quart-sized freezer-safe container. Pipe swirls of red and green icing over the ice cream.
- Add half of the remaining ice cream mixture, then add more icing swirls. Top with the remaining ice cream mixture.
- Sprinkle the top generously with the colored sugar sprinkles.
- Cover the container with plastic wrap or a lid and freeze for at least 6 hours or until the ice cream is firm.
- When ready to serve, scoop the ice cream into bowls or cones.
Notes
- You can use store-bought or homemade Christmas cookies in this ice cream. The cookies will soften a bit in the ice cream, so crunchy cookies tend to work best.
- You can generally find red and green frosting in the baking aisle of the grocery store during the holiday season.
Recommended Products
As an Amazon Associate and member of other affiliate programs, I earn from qualifying purchases.


Nutrition Information:
Yield:
8Serving Size:
1Amount Per Serving: Calories: 782Total Fat: 44gSaturated Fat: 22gTrans Fat: 1gUnsaturated Fat: 20gCholesterol: 108mgSodium: 344mgCarbohydrates: 89gFiber: 1gSugar: 74gProtein: 10g
Nutrition information is automatically calculated and is not guaranteed for accuracy.
Be sure to save this recipe to your ice cream board on Pinterest!

